How to add your own Characters! (V1.2+)

Howllo everyone! Do you want your own characters competing in this tournament of gluttony? Well, I made this very easy to do and all you need to do is follow 5 steps! :D (Note: This tutorial only applies to the Desktop Version of the game because HTML Version cannot perform file control for files it does not directly look for, at least to my knowledge correct me if I'm wrong :3 )
STEP 1: Folder Location!
Run the game once to create the "Characters" folder that will be in the location described below:
- Windows has all files in the %localappdata%\ChowdownShowdown directory.
- Windows 7 however has the files in the /Users/<User Name>/AppData/Local/ChowdownShowdown directory.
- Alternatively, just copy and paste the path %localappdata%\ChowdownShowdown\Characters to automatically be in the folder.
STEP 2: File Structure!
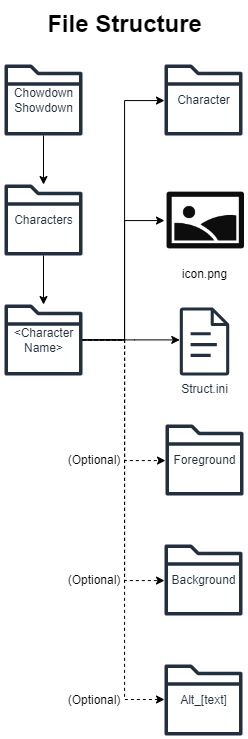
Within the Characters folder, you will need to create a folder for your character, <Character Name>, that can be named whatever you like. Within that folder, you will need the Character Folder, an icon image, and a Struct.ini file. The Character folder is where you'll keep the frames of your character (more on those in STEP 3!). The icon image can just be named icon.png, but if your icon is a jpeg then give it the naming convention "icon_[text].jpg". You can create an empty Struct.ini file by creating a text file and renaming it the appropriate name, but I have provided you one in the game's downloadables. But you can replicate the file from STEP 4 where it explains what the parts of this file does.

You optioanlly can add a background and/or foreground element for your character by creating the properly named folder and dropping the image you would like to use into it. There are more options you can use to have more control with it in the Struct.ini file.
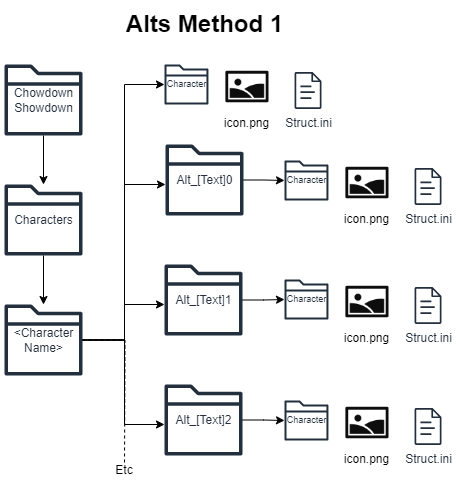
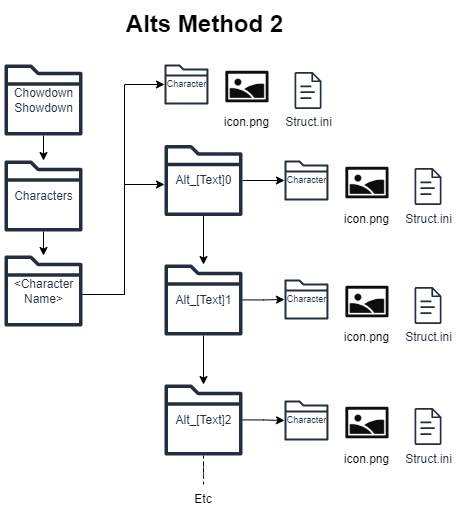
If you'd like to create alternate versions of your character, name the file "Alt_[Text]" and structure it the same as your character folder. They can be placed either all in your character folder (Method 1), within one another like a chain of subdirectories (Method 2), or a combination of the two methods. (Note, alternates still need their own icons, structs, and backgrounds/foregrounds)


STEP 3: The Art!
For the main character assets, the requirements and restrictions are:
- File Types: Can be a .png or .jpg/.jpeg file
- Frame Count: The minimum number of frames you need is 1, but a maximum of 9 is recommended since any more may not be seen. So an average of 5 to 7 is a comfortable range. "Frames" in this context refer to individual files, so for 3 frames of the character you'll have 3 files for the character.
- Frame Size: Each frame unfortunately must be the SAME size! I suggest working with a 400x400px canvas, but you can go up to 600x600px. Any larger and your character may not even fit on screen! You could go the other way and shrink it down to something like 32x32px if you'd want. (Since you can scale the frames up)
- Frame Size Limits: I would also like to mention that for those who want even larger canvases, the game's texture pages are 2048x2048px. This is set so that the game can be ran on Mobile through Browsers since larger would cause it to crash on older phones. Because of this restriction, it means if your canvas is larger the texture pages then you could potentially take up 2x to 4x times more memory then you intend to.
- Orientation: The character should be facing to the left as that is the direction the game handles. You can however also have a front facing character if you desire, you'll just need to toggle NoFlip to 1 in the Struct.ini on STEP 4.
- Frame Naming: Name the files in a numeric order so that it can understand which frame goes first, such as Name1, Name2, Name3, etc.
- Transparency: You can either make the background transparent yourself or leave it a solid color. The bottom left pixel will be used to clear the background, so make sure your background color doesn't match any colors your character uses, otherwise you may encounter graphical errors! You can set POCharacter to "0" in the Struct.ini if you don't want the background to be removed, but then you'll need to make it transparent yourself.
- Transparency Issues: If your background is transparent, be warned that it may effect the color value #000000 (Black) as image editors commonly set transparency as #00000000 (Black with 0 Alpha). You can set POCharacter to "0" in the Struct.ini if you are using a transparent background.
- Icon: You can add a custom icon, which needs to be a 64x64px portrait of the character for the character select screen. The naming convention is "icon[_[blah]]" as the program is looking for the file name "icon" at the start of file. The icon image can be simply named "icon", but if your using a .jpeg format then give it the naming convention "icon_[blah]". The "blah" can be any words, but you need AT LEAST one character after the underscore for this to work!
- Background/Foreground: The Foreground and Background can be in the .png or .jpg/.jpeg format, and do not need to be the same size as your character. But they do follow the Orientation and Transparency rules.
STEP 4: Modifying the Struct.ini!
At a glance, the Struct.ini file is divided into 4 sections, which are Character, Foreground, Background, and Importing. Character adds control to your character sprite such as scaling, flipping, bouncing, and information about them. Foreground/Background share the same usage and have additional controls such as offsetting location, disabling squeeze pull, and even moving the element like how Pilot's friend 53N moves. Importing just controls if the imported images have a transparent background or not.
Some fields will have boolean logic and be referred to as a "flag", but will require a number instead of text. So to simplify False means 0, and True means 1.
[Character]
- Name="???"
- Scalar="1"
- Alpha="1"
- NoFlip="0"
- NSFW="0"
- NoBounce="0"
- Bio="They made it!"
- URL=""
- Creator="null"
These are the main values that control what you can do to your character. Name is for the character's name, by default it will be "???". Scalar is how large your character is needed to render, so you can scale up the 32x32px sprite you have with this value, but by default it will be 1 which means no scaling is applied. You can use a decimal value but know that pixel loss may occur. Alpha controls how opaque/transparent your character image is with 1 being fully solid, 0.5 being half transparent, and 0 being invisible, but by default this is 1. NoFlip when set to true will prevent your character from flipping when being on the left or right side of the screen, by default this set to False. NSFW is a flag that, if true, will hide the character when SFW Mode is turned on, by default this is set to False. NoBounce when true will remove the "squepull" animation effect of the character, by default this is set to False.
As of V1.4.0, three new variables can be adjusted. If the character has any alts, only the first struct.ini file will read these values: Bio, URL, and Creator. Bio will give a blurb about the character in the Bio section of the game. Prior to V1.5 you'd need to add "\n" to the blurb to keep it within the GUI, but V1.5+ fixes this issue. Bio's default value is "They made it!". URL is a weblink that you can add to link to a website such as your art gallery. By default this value is "" (blank) and hence will not open a URL. Creator is the title of the URL link, typically used for titling the creator of the character art, and by default this value is "null" as it indicates the field is unaccredited.
[Foreground/Background]
- Use="0"
- xOffset="0"
- yOffset="0"
- xScalar="1"
- yScalar="1"
- Alpha="1"
- Action="0"
- Frequency="0"
- Intensity="0"
- MirrorFrame="0"
- NoFlip="0"
- NoSquepull="0"
- Bouncy="0"
Both the Foreground and Background use these options, and will be referred as "layer" for simplification of explanations. Use is the flag that indicates if your character is using a layered image or not, by default this is set to False. The xOffset and yOffset both offset the layer element by that value, relative to the left center of your character if they were facing right, these values are 0 by default. yOffset is to be noted that negative (-) makes the layer go up and positive (+) makes the layer go down. xScalar and yScalar both stretch the layer in the horizontal and vertical directions respectively, by default these are 1. Alpha controls how opaque/transparent your layer is with 1 being fully solid and 0 being invisible, by default this is 1.
Action is special variable that gives your layers more versatility and visual flare!
- 0: By default this value is 0 which means no actions are to be taken.
- 1: This will apply a floating effect as seen with Pilot's 53N.
- Frequency is the variable that controls how long the action plays before looping, this measurement is in frames per second (fps) which and for this game it runs at 30fps. By default the value is 0 when not in use, and should NEVER be negative!
- Intensity is how strong the action's effect is. By default this value is 0 when not in use, and can be negative to reverse the animation loop.
MirrorFrame is needed if your layer needs a different frame to use when the character faces a certain direction, with the first frame being the right facing, and the second frame being the left facing. By default this is set to False, and overrides the variable NoFlip. NoFlip when True will prevent your layer from flipping when being on the left or right side of the screen, by default this is set to False. NoSquepull when true will remove the squepull animation effect of the layer, by default this is set to False. Bouncy when True will cause the layer to bounce with your character when they score, by default this is set to False.
[Importing]
- POCharacter="1"
- POBackground="1"
- POForeground="1"
- POIcon="1"
Each of these corresponds to a file that maybe used for importing. Basically they read as "Punch-Out" image file, where POCharacter is for the Character frames, POBackground if for the background image, POForeground is for the foreground image, and POIcon is for the icon image. By default these values are set to True.
STEP 5: Have Fun!
That's all you need to do to add your own characters! I hope to see a bunch of your characters added to the game soon! And if you wish for your character to be officially added, just ask nicely and send me the files, I don't mind occasionally updating this game with your characters.
Thank you for your time and interest, have a nice, fun, and wonderful day! :3